Create objects from the UI
To make a production object visible to the Rhize data hub, you must define it as a data model. Along with its API, Rhize also has a graphical interface to create and update objects in your role-based equipment hierarchy.
Often, one object references another: for example, a piece of equipment may belong to an equipment class, have a unit of measure as a property, and be associated with process segment. These associations form nodes and edges in your knowledge graph, so the more information relationships that you accurately create, the better.
Prerequisites
Ensure that you have the following:
- Access to the Rhize UI
- Information about the equipment that you want to model
General procedure
- From the UI, select the menu in the top corner.
- Select Master Data, then the object you want to configure.
- Create new (or the plus sign).
- Name the object according to your naming conventions.
- Fill in the other fields. For details, refer to the Master definitions and fields.
You can create many different objects, all with their own parameters and associations. For that reason, a general procedure such as the preceding lacks any interesting detail.
To make the action more concrete, the next section provides an example to create plausible group of objects.
Example: create oven class and instance
AG holdings is a fictional enterprise that makes product called Alleman Brownies.
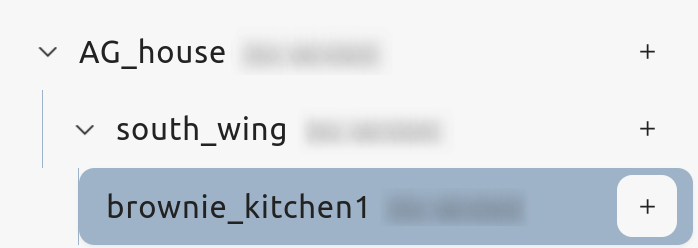
These brownies are produced in its UK site, AG_House, specifically in the brownie_kitchen_1 work center of the south_wing area.
The brownie_kitchen_1 kitchen has oven_123, an instance of the Oven class.
This equipment item also has a data source that gives temperature readings, which are published to a dashboard.
Here’s how you could use the Rhize UI to model this.
Model the equipment levels:
From Master Data, select Equipment and enter
AG_houseas the name.Give it a description. Then for Equipment Level, choose
Site.From the new
AG_Houseobject, create a sub-object with the + button.Name the object
south_wingand chooseAreaas its level.Repeat the preceding steps to make
brownie_kitchen1a work center in thesouth_wing.Once complete, the hierarchy should look like this:

Model the Oven equipment class:
- From Master Data, select Equipment Class.
- Give it a name that makes sense for your organization. Give it a description, such as
Oven for baking. - Add any additional properties.
- Create .
- Make it active by changing its version state.
Create the associated data source:
- From Master Data, select Data Source.
- Add the source’s connection string and protocol, along with any credentials (to configure authentication, refer to Agent configuration.
- Select the Topics tab and add the label and data type.
- Create and make the version active.
Now, create an instance of the Oven.
From Master Data, select Equipment. Then create a sub-object for the
brownie_kitchen1work center.Add its unique, globally identifiable ID and give it a description.
For Equipment Class, add the
Ovenclass you just created.For Equipment Level, select
WorkUnit.Create.
After the object is successfully created, you can add the data source.
From the Data Sources tab, select Link Data Sources. Select the data source you just created.
On success, your UI should now have an item equipment that is associated with an equipment level, equipment class, and data source. For a complete reference of all objects and properties that you can add through the UI, refer to the Master definitions and Fields](/how-to/model/master-definitions/).